
Your first stop-motion correction
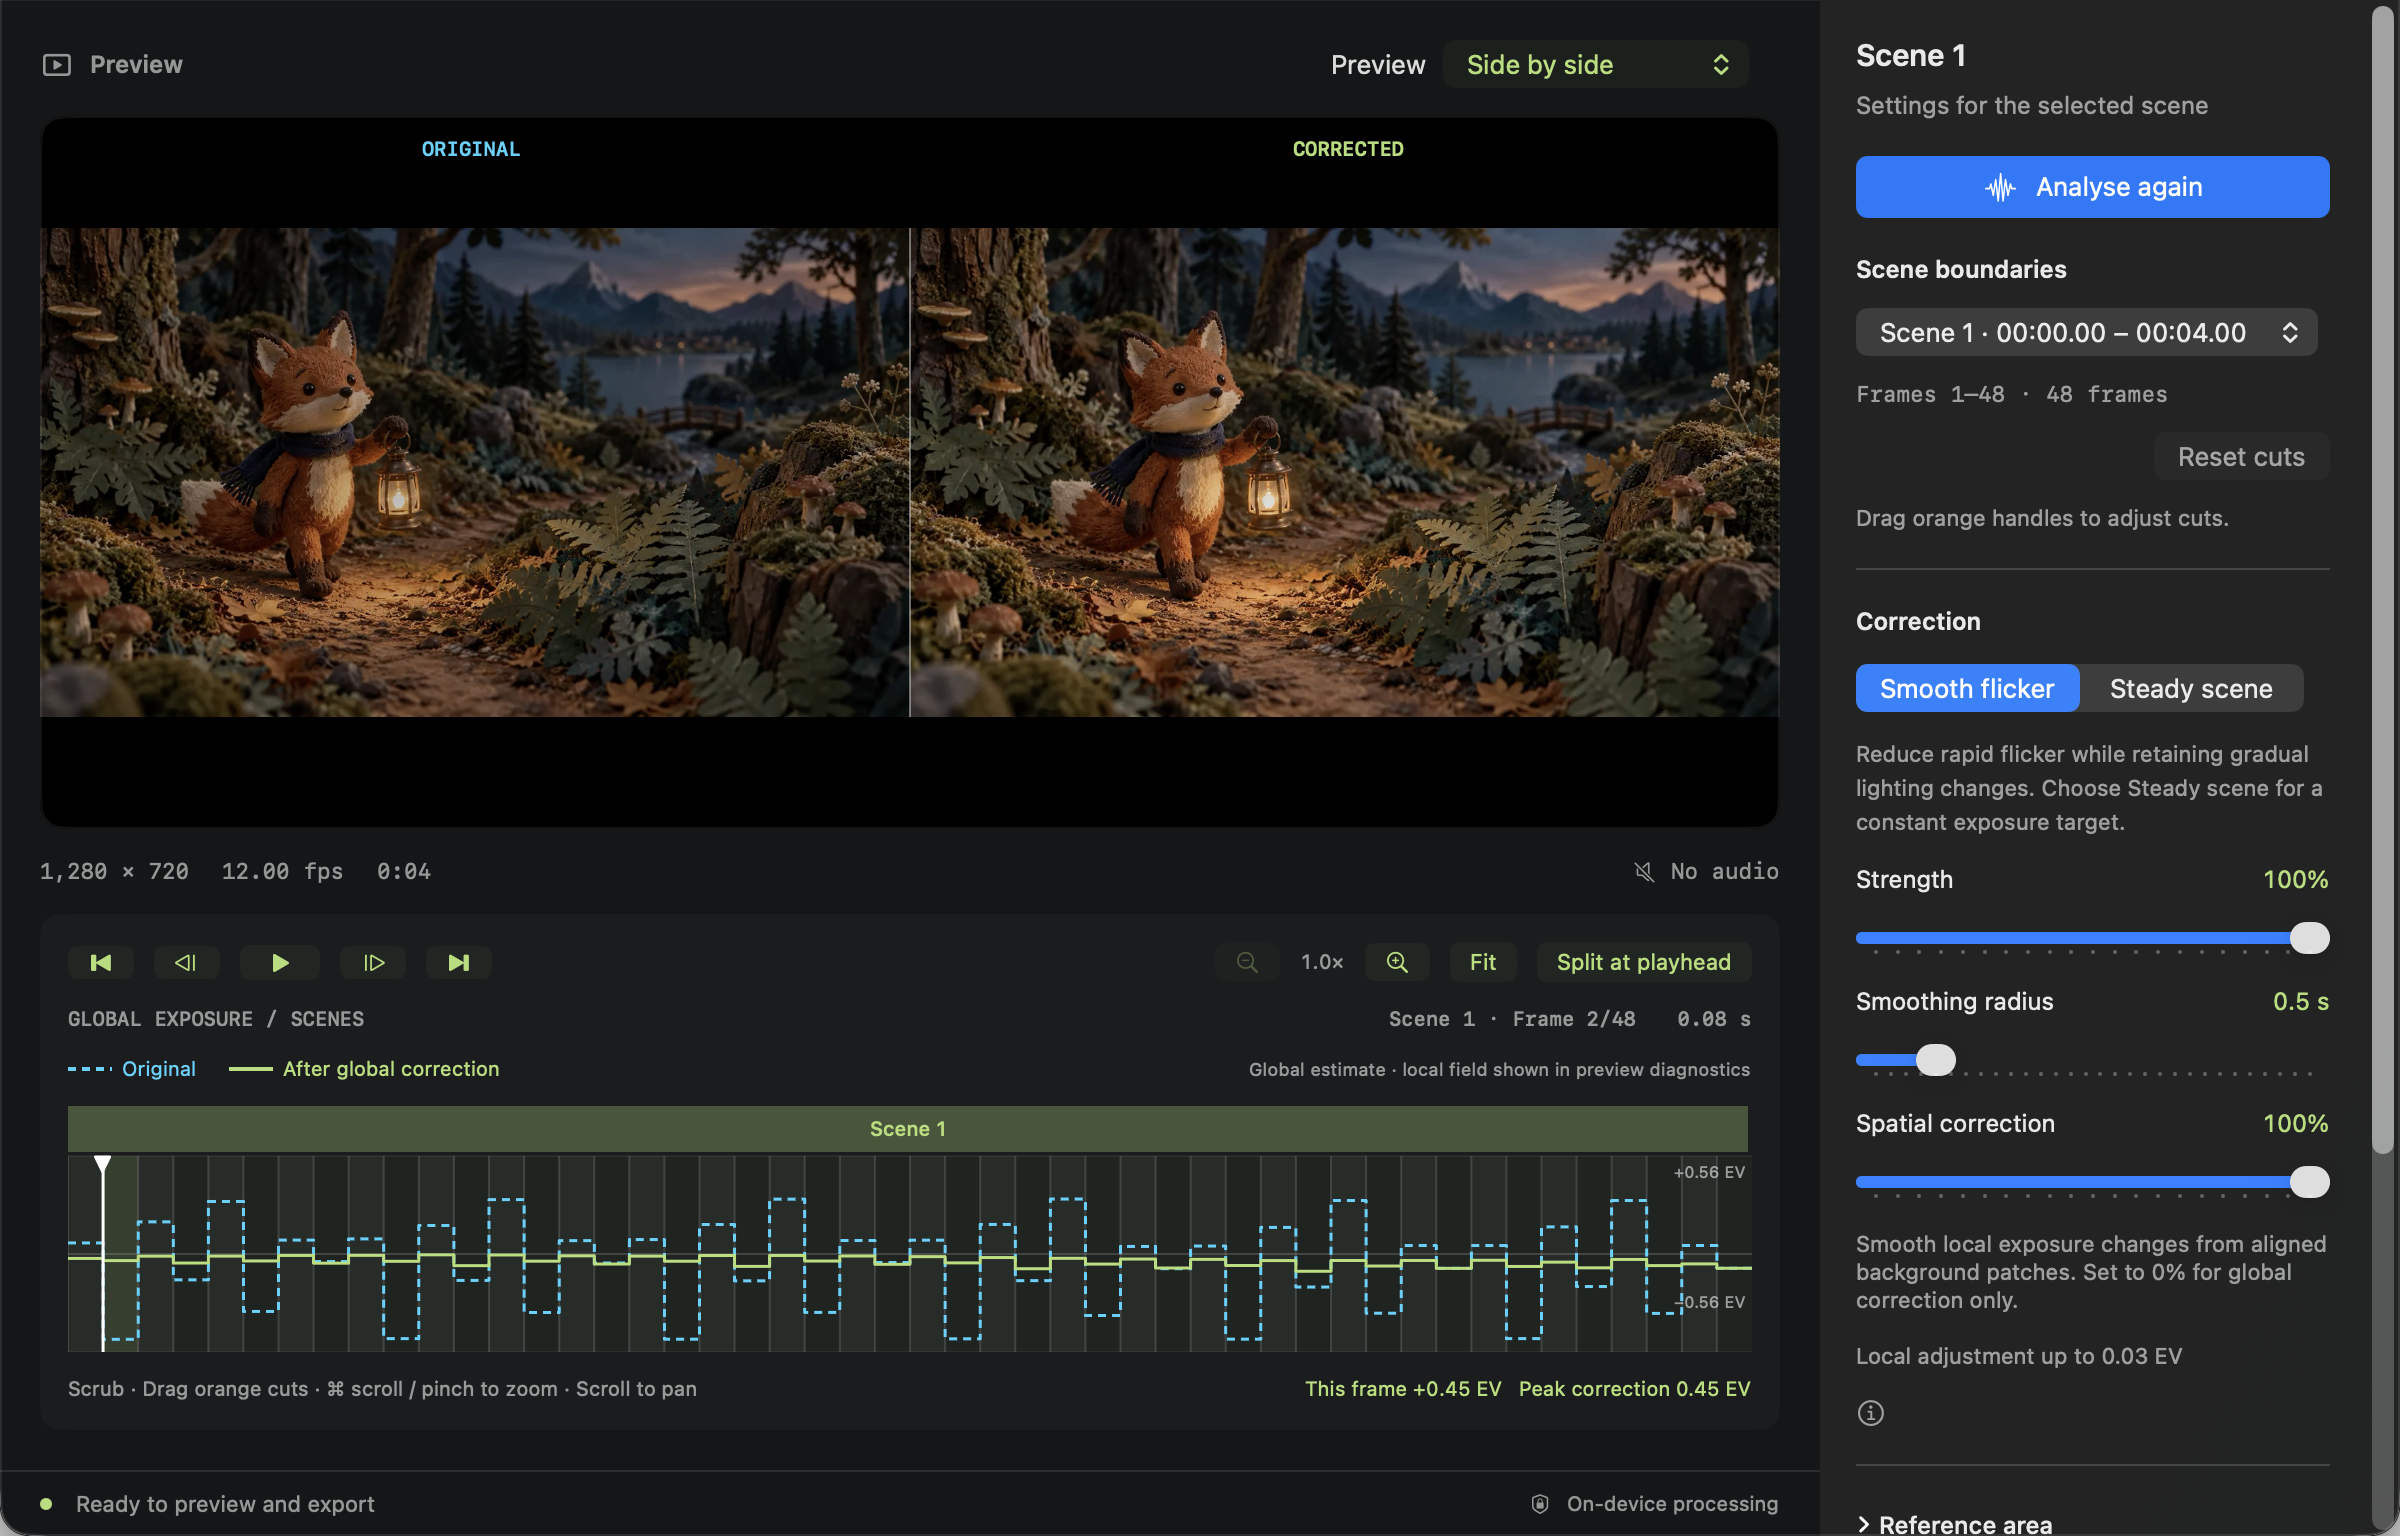
Open a clip, analyse it, compare the same frames, and save a corrected copy.
macOS 14+ · SDR video · no side larger than 4096 pixels
Start with an appropriate copy.
Use SDR H.264 or HEVC in MOV/MP4, or SDR ProRes in MOV, where readable by macOS. HDR (HLG/PQ), protected media and oversized video are unsupported. Make an unprotected SDR Rec. 709 copy in your editor first if necessary. Keep your source. HDR support is planned for a future update; the current version requires SDR footage.
Open and analyse.
Choose Open Video… (⌘O) or drop a file into the window, then Detect scenes & analyse. For practice, Help → Open Demo Video opens the built-in sample. Wait for Analysis complete and note the scene count.
Check cuts before correction.
Click each scene band and inspect its beginning/end. Step with ←/→ around a suspected cut. Automatic detection uses the whole frame; a flash may need review. A target should not combine two different shots. Follow the scene-boundary guide for edits.
Compare the same source frame.
Choose Preview → Side by side: Original is left and Corrected is right. Both show the same decoded source frame. Use Space for playback, arrows for one-frame steps, and first/last buttons to inspect edges. The comparison view does not change exported dimensions or create a split-screen export.
Start with moderate adjustments.
Select a scene. Smooth flicker preserves gradual changes; start with a 0.5 s radius and adjust strength while comparing. Spatial correction controls local variation separately. Use a stable background reference when moving subjects dominate measurement. Set strength to zero if the scene should stay uncorrected.
Review the entire clip.
Watch at normal speed and step over difficult frames. Check shadows, highlights, camera movement and intentional fades. Improvements vary with usable background detail; exposure correction is not general colour grading or white-balance repair.
Export before ending the session.
Choose Export, a format/quality, and a destination. Open the saved result in a player and review it. Save Project (⌘S) keeps editable settings in a small .frankluma file. Keep the original video with it. Exporting a movie does not save the project; save both if you want a finished copy and an editable version.
Understand the exposure graph
Dashed cyan shows original exposure and solid green predicts exposure after global correction, on the same EV scale and scene baseline. Lines break at cuts. “This frame” is global correction in stops: positive brightens and negative darkens. Spatial adjustments appear in preview diagnostics. This graph is not a measurement of the encoded export.
Expected result and limits
You should have a separate corrected video and an untouched source. A static, consistent background gives the estimator stronger evidence; large camera moves, occlusions, clipped highlights and colour changes may leave residual variation. Do not increase strength merely to make a graph flat.
Open this workflow as a printable guide →Review and edit scene cuts
Separate different shots and keep correction settings independent.
An analysed clip
Locate a boundary.
Choose a scene in the inspector or click its timeline band. Zoom near a cut with ⌘ + wheel, trackpad pinch, or magnifier buttons. Scroll/range slider pans; Fit restores the whole clip. At close zoom, slices represent actual source frames.
Find the first frame of the next shot.
Step one frame at a time. The preview, playhead and scene selection stay aligned. A boundary should sit immediately before the first frame that belongs to the next scene.
Adjust the orange cut.
Drag its handle; it snaps to source frames. Use inspector Start frame/End frame steppers as a precise keyboard alternative. Neighbouring boundaries cannot cross and every scene retains at least one frame.
Add or remove a cut.
Place the playhead at the frame that should begin a new scene and choose Split at playhead. The new scene inherits parent settings. To remove a boundary, select the later scene and choose Merge previous; the earlier scene’s settings win.
Review the resulting settings.
Select each affected band and compare its mode, strength, radius, spatial correction and reference. Settings remain per scene unless you choose Apply these settings to all scenes. That action copies mode, radius, strength and reference, so use it only when those measurements suit every shot.
Reset or analyse again when appropriate.
Reset cuts restores automatic positions and maps settings to the resulting scenes. Re-analysis preserves manual boundaries and settings when source frame timestamps are unchanged. Check each affected cut after either action, then export once the full clip is satisfactory.
Why scene boundaries matter
Targets and baselines stay within scenes. Combining different camera angles or lighting setups can produce an inappropriate target. A reference area measures exposure separately; selecting one does not detect or move cuts. Avoid creating many tiny scenes just to suppress a bad frame—first check the intended shot structure.
Frame numbers and timeline zoom
Click within a visible frame slice to select it. Holding ⌘ while scrolling zooms around the pointer; ordinary scrolling pans. Fit returns to the full duration. Inspector frame numbers are the UI numbering; diagnostic sample arrays may use zero-based indices, so include the visible frame number when asking for support.
Open this workflow as a printable guide →Tune correction and choose a reference
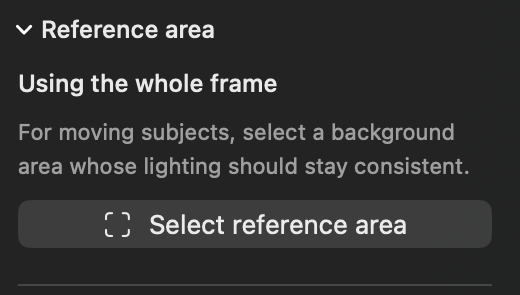
Use a stable background, interpret diagnostic views, and keep intentional lighting changes.
An analysed clip · a scene selected
Pick the correction mode.
Choose Smooth flicker to retain gradual lighting changes or Steady scene for one median exposure target. Steady scene can reduce deliberate fades. Try Smooth flicker first when the scene includes a lighting ramp.
Change one control at a time.
Compare strength at a few representative frames, then adjust smoothing radius from the 0.5 s starting point. Larger radii smooth slower fluctuations. Spatial correction adjusts local changes; reduce it if local detail looks unstable. Set strength to zero to leave the scene uncorrected.
Choose a reference that stays visible.
Look for a textured static background with consistent intended lighting. Avoid moving characters, changing occlusions, very dark areas and clipped highlights. In Side by side, use the original image on the left.
Draw and verify the area.
Expand Reference area, choose Select reference area, and drag a rectangle in the preview. Confirm “Using your selected area” and compare across the scene. The reference is cached across the clip for boundary adjustments. It belongs only to the selected scene and does not change cuts.
Return to the whole frame or share settings.
Use Use whole frame to remove the custom reference. Apply these settings to all scenes copies the reference and correction settings to every scene; the same rectangle may be inappropriate after a camera cut. Review each scene before applying it globally.
Inspect the diagnostic views.
The Preview menu offers Confidence mask, Motion mask and Correction field alongside Original/Corrected/Side by side. Use them to inspect where correction has support and where local changes occur. The correction field shows effective gain including tone mapping and highlight protection. They are review aids, not an exported quality score.
Save diagnostics only when useful.
Expand Diagnostics → Save diagnostics… and choose a local destination. Files include frame measurements, settings and gain/offset/confidence data. Mean estimates exclude pixel-level protection; check encoded output separately. Review files before sending them to support.
Too little stable content
The inspector reports stable patches for the scene. Fewer than 12 usable patches gives zero correction and a notice. Try a stable reference or revise the scene boundary. A tiny, dark or clipped reference is not necessarily better than the whole frame.
Judge the picture, not only the line
The green exposure line covers global correction. Local exposure/tone adjustments may change brightness and contrast elsewhere. Strong motion and unsupported regions can fall back toward global correction. Check texture, shadows and highlights in actual playback; colour instability needs separate attention.
Open this workflow as a printable guide →Choose a format and export your corrected video
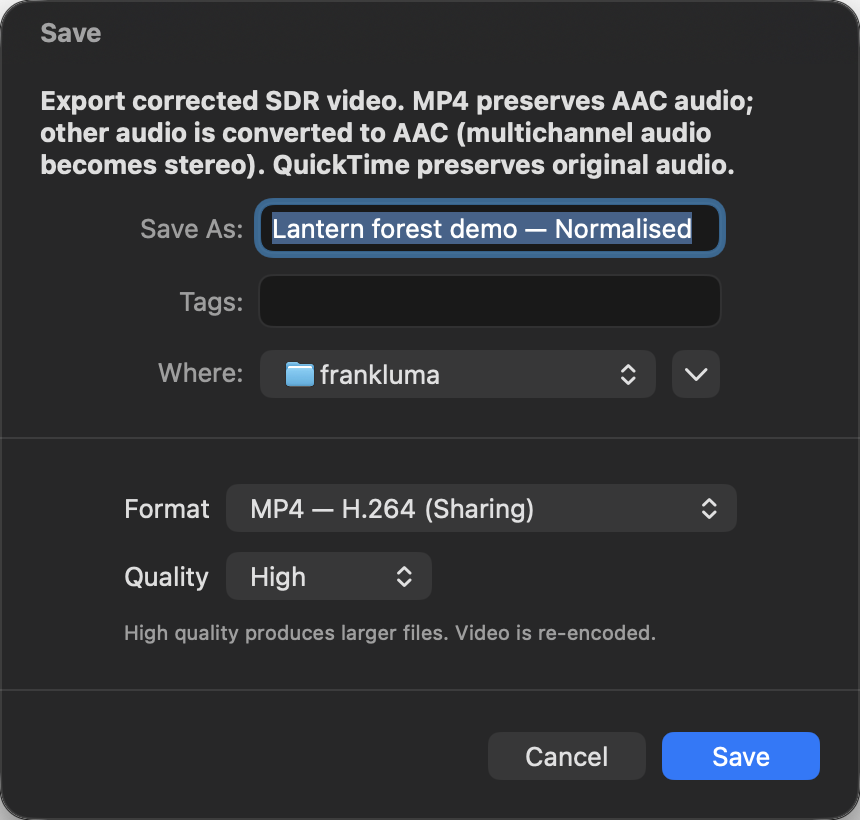
Use MP4 for sharing or QuickTime for editing and original-audio preservation.
An analysed clip · writable destination and sufficient storage
Finish reviewing the correction.
Play the clip at normal speed, inspect cuts and difficult frames, and choose a correction you want to keep. Preview mode is for inspection; export always writes one corrected picture at original dimensions, not the Side by side layout.
Open the save dialog.
Choose Export… (⇧⌘E). Give the file a clear name and choose a destination. Keep the source and corrected result distinguishable. Select Format before confirming the extension.
Choose a codec/container.
Use MP4 — H.264 (Sharing) for a broadly usable sharing copy. H.264 is also available in QuickTime. HEVC offers a smaller-file option in MP4 or QuickTime, but check receiving software compatibility. QuickTime — ProRes 422 (Editing) suits further editing and uses more storage.
Choose quality and understand audio.
H.264/HEVC offer Standard or High quality; High produces larger files. QuickTime preserves compatible original audio. MP4 preserves AAC; other audio is converted to AAC and multichannel audio becomes stereo. Choose QuickTime when preserving those original audio tracks matters.
Save and let export complete.
Choose Save. You can cancel the operation; cancellation does not replace an existing destination. Keep the source drive connected and leave space for processing. The source file is not modified. ProRes uses a higher-precision processing path but is still a re-encoded video, not a lossless source copy.
Check the encoded file.
Use Show in Finder when export completes and open the result in a player or editor. Verify dimensions/orientation, duration, end frame, audio and a few difficult scenes. A correct preview or smooth graph does not by itself prove the encoded file looks right.
End the session only after saving what you need.
Use Save Project (⌘S) before closing if you want to resume editing. Exported movies and saved projects are separate outputs. Closing with unsaved edits offers Save Project, Discard Changes or Cancel; choose Cancel to keep editing.
Choose based on the destination
An MP4/H.264 sharing copy is different from an editing master. HEVC decoding varies with receiving hardware/software. ProRes 422 prioritizes an editing workflow and storage cost. No format reconstructs highlight detail or fidelity already missing in the source.
Troubleshoot export
Check free space, folder write access and source availability. Select another writable local destination using the save dialog. If audio conversion fails, try QuickTime to preserve compatible original audio. Copy the exact error along with codec/container/quality and macOS version when contacting support.
Open this workflow as a printable guide →Save, reopen, and recover a project
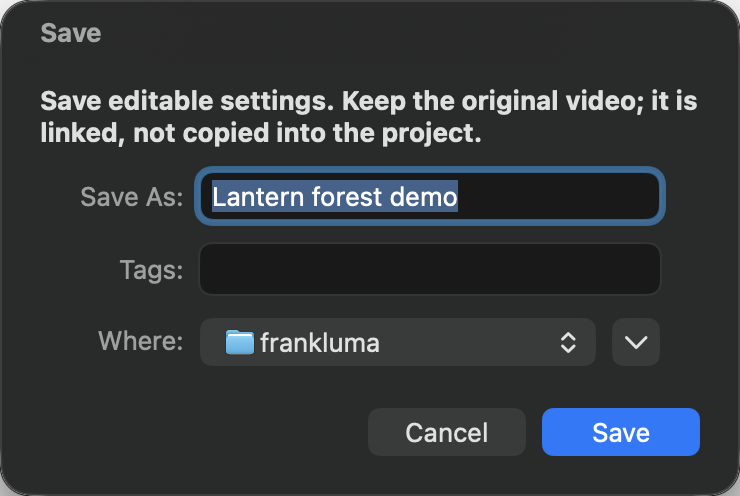
Keep editable settings, relink moved source videos, and recover unsaved changes.
An analysed clip · original video retained
Save an editable project.
Choose Save Project (⌘S). Name the
.franklumafile and choose a location. It stores scene cuts, references, correction settings, export options, current frame and preview mode. The original video is linked, not copied into the project.Keep the source beside your project.
Keep the video available and unchanged. The project contains its source path, identity fingerprint and macOS access bookmark, but neither media nor cached frame analysis. For handoff, send both the video and project. Project files can expose source filenames/paths and editing settings.
Create a second editing version.
Choose Save Project As… (⇧⌘S) for a separately named version. It becomes the active save destination; later Save Project updates that copy. Exporting a corrected movie does not save editable settings.
Reopen and wait for analysis.
Choose Open Project… (⇧⌘O), open it in Finder, or drop it on FrankLuma. The app checks the source and repeats analysis and reference measurements before restoring edits. Invalid projects, source mismatch or cancelled analysis leave the current session intact.
Relink an identical moved file.
macOS bookmarks may follow a moved source. If the file cannot be found, locate it when prompted, or use File → Relink Source Video…. Choose the original or a byte-identical copy. A transcode or modified video does not match the fingerprint; begin a fresh session for a changed source.
Recover after an interruption.
On launch, choose Recover, Keep for Later or Discard for an offered local checkpoint. File → Recover Unsaved Session opens the newest checkpoint; others remain available afterward. Recovery needs the source and repeats analysis. A recovered session is unsaved, so use Save Project to keep it.
Check saving before leaving.
Unsaved changes are checkpointed locally after a brief delay, separately for each session. If a recovery-write failure appears in the footer, use Save Project. A successful save or deliberate closure/discard removes that session’s checkpoint. Keep for Later retains it. Closing with unsaved changes offers Save Project, Discard Changes or Cancel.
Keep a complete backup
Back up both .frankluma and its exact source video. The project alone cannot render your film. Diagnostics are useful review data but are not a substitute for the editable project or media.
Why relinking can be rejected
FrankLuma checks SHA-256 content identity to avoid applying cuts and measurements to a different video. Even a visually identical re-encode is a different file. Recover the original copy or open the replacement as a new video.
Open this workflow as a printable guide →Timeline, preview and diagnostics reference
Click/drag the graph to scrub. Arrow keys step one source frame; Space plays/pauses. Pinch or ⌘ + wheel zooms around the pointer, ordinary scroll pans, and Fit shows the whole clip. The same timeline drives both halves of Side by side. The cyan source and green predicted-global lines use the same per-scene baseline. Local fields are shown in diagnostics, not this global line.
The scene patch count reports usable stable measurement regions. A low count means the estimate has little support; under 12 usable patches produces zero correction. Confidence/motion/correction-field views are aids for inspecting support, movement and effective gain. Saved diagnostics contain measurements and settings; they do not establish encoded-output quality.
Troubleshooting checklist
Access or a source is unavailable.
TonePebble: verify permissions for the installed app, source switches and a capture test. FrankLuma: verify the file remains accessible and is unprotected SDR within size limits.
My edits are saved but the shared result is old.
TonePebble drafts preserve an arrangement separately from finished audio. Save recording or Save edited copy and share. FrankLuma needs a new movie export after correction changes. Save Project preserves editable settings separately from the finished video.
Playback or processing is stalled.
Check the chosen output, Activity or the operation’s error message. Keep source/external drives connected. If cancellation is offered, let it finish before retrying. Make a note of the exact error and the step that caused it.
Contact support
Email [email protected]. Include your macOS and app versions, the workflow/step that failed, exact error, source formats and selected settings. Include dimensions, codec/container, scene/frame and export format. Share private recordings or diagnostics only when needed and after reviewing them.